Showing posts with label applique. Show all posts

Sunday, August 24, 2014

Charms, Feathers, Mardi Gras!

Thank you Lisa!  I’ll admit that this one was indeed a challenge.  It had me stumped for the longest time. I mulled it over, sketched ideas, set it aside, and cogitated further.  What do you do with all of this?

At last!  One week prior to reveal day I had my idea.  It would need cutting, fusing, and embellishing.  Yup!  I took your beautiful hand dyed fabric pressed it to Misty Fuse and slashed it apart.  It looked like this when I was done.

Next I chose fabric that would act as a canvas for my idea.  Using a stencil and some Shiva paint sticks, I created a border.

A few more pieces had to be cut; some of them fussy.

Now it was a matter of arranging all of the pieces, fusing them to the background and doing some FMQ stitching to hold things in place.

With everything now “stuck” in place there was no turning back.  Embellishing was the next order of business and your charms and fibers fit in perfectly.  I added some additional items, some hand embroidery and some fancy machine stitchery.  You can hop over to my blog and see more process pictures.

So what do you think?  Does this remind you of Mardi Gras?  

Saturday, March 22, 2014

Tumbling into the rear

Well at long last I have managed to finish my piece.  A family event had kept me from my sewing machine and the muse was having no artistic licence at all.  Nevertheless, I spent time trying to coming up with something.  I had recently attended a workshop by Sue Benner, where we studied various design concepts. One in particular, rectilinear design, nudged my creative juices.  I started looking at square, rectangular, and oblong design settings.  One in particular kept coming up.  Here is a picture of what I kept seeing.
 and another one

Numerous pictures of "Tumbling Blocks" quilts.

I had created some "odd" blocks in Sue's class that gave the impression of being tumbled.  They looked like this.

I had already given an idea to Lisa for this challenge so I couldn't use that one.  She blogged about it here. Yup! That's when the epiphany hit.   If artistic licence gives me the freedom to take something, change it, and still have it be recognizable, then here is my rendition.
But to get the entire effect of how I used artistic license here is the full picture.  You can read about it's construction here.
Go figure...I've called it Blocks Tumbling. Ta da, more artistic license!  LOL!  Thanks Judy for the theme.  It was a challenger.


Sunday, January 12, 2014

A Tribute to Frank Mills

So what do you think of when you think of music?  Opera, Rock 'n Roll, Jazz?  It was a question I asked myself when Janet suggested this theme.  First I thought of portraying a musical instrument; something like this:
 
But this wasn't striking a chord with me.  I thought perhaps rendering the image of a great musician might do the trick, something like this:
 
 
Nope this wasn't sounding the right note for me either.  Okay, more research and I thought, hmmm maybe a well know album cover, something like this:
 
 
This "mouldy oldie" was not going to play nicely in fabric.  Maybe I was taking this too literally, so I browsed my music collection and heard this:


This provided the harmony that I needed to get me started and on my way to completing a piece for this challenge.  So my tribute to Frank Mills is my interpretation of this particular melody in fiber. 
 
 
Thank you Janet for bringing MUSIC into my studio. If you step over to my blog, you will see how I put it all together.

Monday, September 16, 2013

Post Script

Thanks to all of you for your kind words after I posted my latest almost-done challenge quilt!

I have to say that being OPEN and honest has been rather invigorating for me and has caused my creative mojo to runneth over!  I spent almost the entire weekend creating!!! I didn't even get dressed yesterday because I was so busy!!! What a wonderful feeling!!

So now challenge #11 is done!


"EXPOSED"

 and a close up of some of my embellishments...


Friday, September 13, 2013

Full Disclosure (almost)

Sorry I am late posting!  Life is full! I just returned from having lunch and shopping with my oldest daughter who is away at college about 1 1/2 hrs away. As I returned home, I snapped a few shots (texting while driving is illegal but they have not outlawed snapping pics while driving... yet!). 


Driving on the OPEN road and enjoying views of the OPEN sky! Wish I had thought of that sooner!!!!

Anyway, in the few years since we began this group, we all have found that one of our Tangled Textile challenges tends to speak to us more than some of the others and creative juices just flow.  However, since last summer I have had a lot of difficulty producing finished work for our challenges,  much less any art at all. It has been really frustrating!! In years past, making art had been a creative outlet.... an activity that I enjoyed. But it seems that recently when I do finally come up with ideas, I have had a particularly difficult time getting anything on the page or the fabric.

For our latest challenge, I actually began a project (#1), got some technique ideas from a book, enlarged the "pattern", cut out all the fabric parts and began arranging them.  But as I looked at the work-in-progress on my studio floor (where else?)


..and it sat there for a few weeks (!), I could not complete it... so it was tossed.
Discouraged and running short on time....I perused my photos. Project possibility #2 never really got off the ground but involved one of my favorite photos from this summer. 
 

And then amid the chaos of my mind and my heart, an idea was born. However, this idea which involved a weekend (last weekend to be exact!) of hand dyeing, hand applique, machine sketching, embellishing .... meant that I would be exposing a part of my life that I have kept private FOREVER....
Merriam Webster defines exposed as, "1. open to view, 2. not shielded or protected."
But I kept working on project #3 because my heart said, "sew what you know." 

What I know is depression.... since I was about 12 years old.  Over the many years, I have been prescribed a variety of medications, I have graced the couches of psychologists, social workers, psychiatrists, a mental health worker at a student health center, and various counselors in many cities. I have read books about self-acceptance, hope, healing, agreements and I still have many more books to read. And yet, for some reason,  melancholy hangs on.

And sew I am......
EXPOSED


Well, it is not quite done!

So I will post again when it is complete!

Monday, January 28, 2013

it’s a blue nightfall, now I weep

I had so much inspiration, that it was difficult to choose one subject. I started with the idea of making a Blue Jeans Boro quilt. I was so intrigued by pieces I had seen on the Internet, but it didn’t work for me in the 16" x 16" size.

Another idea was to make a Flower Power Blue Jeans, a quilt from denim covered with blue appliqued flowers. I remember I had a Blue Jeans in the Seventies with flowers all over it.


it’s a blue nightfall, now I weep
mixed media - 16" square
Blue Nightfall is the name of CD and a song by Jimmy Lafave and the inspiration for my final BLUE piece. When I listen to this song, it gives me the blues.


‘It’s a blue nightfall, now I weep’ is made of hand dyed fabrics, pieces of batik, angel wire (that’s what it says on the package), gilding flakes, fabric paint and some hand dyed threads for the hand stitching. It’s machine quilted in straight lines.

I took pictures of the process. All about that is on my blog.

Thanks to Beverly for a theme that held so many options in it and kept us busy!

Nicolette

Saturday, November 10, 2012

Brainstorming Blues

In an effort to post more about the process of how I reach my end result, I thought it might be a good idea to begin at the beginning so to speak.  I'm not sure how the rest of you do it, but trying to come up with ideas, for me, usually involves some brainstorming.  For instance,  this theme.....blue.  I thought of adding an "s" making "blues". Of course this led to thinking of music, which led to
Blue suede shoes.  So I googled blue suede shoes to see what images I could find that might be workable.  As it turned out there were quite a number. I could use applique and some FMQ thread painting with a bit of hand embroidery thrown in.

I also discovered that there was a musical group called Blue Delft.  Blue Delft? Isn't that a type of pottery?  more googling....
Ah...yes blue delft.  Now that might work.  I could try some dyeing with resist to create pattern that would resemble this.  Then I remembered that I heard about something called blueware. 

So more research and this is what I found.
Hey wait a minute.... Wedgewood is also blue.  More images for inspiration to seek out.
But is pottery or china the way I want to go?  Perhaps there is another train of thought to take.  There is also the idea of a "blue mood"....hmmmm....or "blue blood"......gonna check that out too.
 
Then of course there is Gainsborough's "The Blue Boy".  So this is the start of my "Blue" piece.  Brainstorming blues so to speak. 
 

Wednesday, October 24, 2012

Fowl Beginnings

Well this was indeed a challenging theme Vicki.  So to get going I began to think of beginnings.  What came to mind initially was a collage; a collage showing all the various beginnings of trees.  I envisioned the start of a maple tree, an oak tree, a ginko, but couldn't find the seed for a ginko.  So I began again.  Call it another beginning if you like.

I was quickly running out of time.  Then I started to get the seed of a Beginning.  Stay with me now.  I gathered some of this;

some wool roving and some of this...

                      fur that had feather like pieces. 
I sewed this into a circle, but it wasn't turning out the way I had envisioned.  But then I found some of this...
a decorative yarn that I had stashed away
 
I added this to the circle but it kept getting caught on the sewing machine foot.  Tracing paper helped to keep it in place while I zig-zagged it and tore away the paper, like this.

Are you beginning to get the picture? No? 
 
How about some additional embellishments?
 
 
Okay so I added some appliqued leaves, some, FMQ, and I finally had my Fowl Beginning.
 
Thank you Vicki this one was fun. 
 
"First comes thought; then organization of that thought, into ideas and plans; then transformation of those plans into reality. The beginning, as you will observe, is in your imagination." --Napoleon Hill
 

Wednesday, August 15, 2012

its all about the details

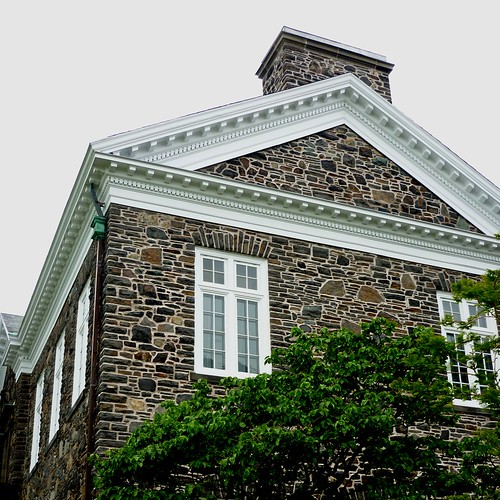
at least it is for  me!  I'm very much one who likes the little architectural details, and older buildings have so much character.  When I was in Halifax, Nova Scotia earlier in the summer, I took some pictures of some of the older campus buildings at Dalhousie University.

The MacDonald Building, Dalhousie University, Halifax
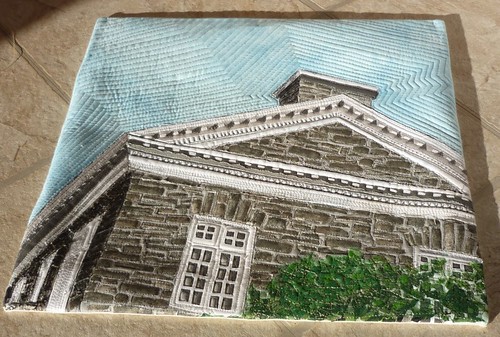
This building, the MacDonald Building, was the University library at one point.  I really like the crispness of the white dentil trim against the stone walls.  The building was built in 1914.  This became the basis for my challenge quilt.  One thing that I've discovered in doing these challenges is that I am most comfortable working from a photo.  I have a hard time with abstract, and as much as I would like to give it a better try, I'm just not comfortable there very often, and usually do not like my results very much, so I stick in my comfort zone, although this time I did take markers to my finished quilt!
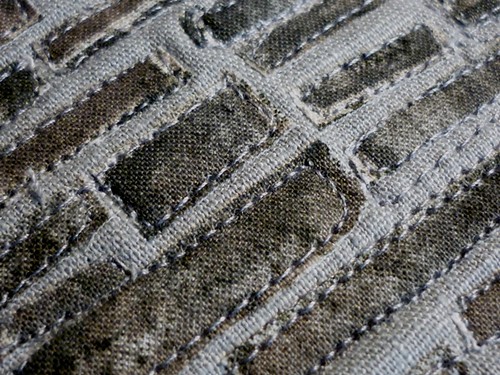
So here's my progress - working from an enlarged photograph, I sketched out my pieces and started cutting fabric.  I had this great brickwork fabric in my stash, but it was  a little too regular a pattern, so I applied fusible web to it and then cut it up in much smaller, random size pieces, and applied them to my background - a combination of one of my hand dyes for the sky and a medium grey, which became the grout lines.


starting point
the starting fabric
brickwork
the resulting fabric
I then added white and a darker grey to create the background and shading for some of the trim areas.  Many itty bitty little pieces later, I was progressing well.


progress
progress

I added lots of little pieces of a couple of greens to create the bush, and used a layer of green tulle over them before quilting them down.  A lot of the detail in the trim was added with some thread painting and the quilting, but I was at a loss as to how to quilt the sky until I decided to just echo quilt it. with straight closely placed lines.


free motion foot

but it was still missing some shading and some of the finer details,

so out came my gel pens and markers, and with nary a hesitation, I attacked my finished quilt! I'm very pleased with how it has turned out!  (not so pleased with this picture - the sun was shining so brightly but I'm not really complaining!)


The MacDonald Building
The MacDonald Building in fabric
different angle

Thank you Nicolette for a really fun challenge!

Happy quilting!


Nature's Little Architects


When Nicolette announced this theme, my first thought was to depict a well-known building or bridge.  But naw, I wanted something to add to the challenge of the theme.  Okay call me crazy.  So then I thought about using a landmark…that’s a structure right?  I thought about several possibilities and considered Stonehenge might work.  A friend had suggested it when she learned that I was having trouble picking something.

My epiphany came while watching a nature program about bees.  No I’m not inclined to watch nature programs.  I was channel surfing and there was nothing else worth watching... but I digress.  At one point the announcer said “watch nature’s little architects busily working within the hive…” That was all it took. 

So here is my depiction of the architecture of the inside of a hive with the  “little architects” busy at their construction.

I was at a bit of a loss on how to create the little critters, but some felt, angelina and embroidery floss did the trick.  Here is a close up of the bees.
During this challenge I learned some valuable lessons.  Besides the lesson "start earlier" I also learned to experiment a lot more with various "supplies" to achieve the look I was attempting to portray.  Stitching through fused fabric by hand was not an easy task; another lesson.  Final lesson learned...your quilt really does tell you what it needs, if you only listen. 

I ready to listen to what the next quilt is going to tell me.

a star for Gaudí and Jujol

No houses, buildings, landscape architecture, skylines, or hill-top villages from the Provence. I considered all these ideas to discover that it was very difficult to work on the theme that I suggested myself!
detail of the center of the quilt
One of the meanings of Architecture is Construction. I wanted to try a new quilt construction technique and was inspired by the mosaics in Park Güell (Barcelona), a park designed and built by Antoni Gaudí and partly decorated by his co-worker (fellow architect) Josep Maria Jujol.


There is a lot of confusion and discussion going on on the internet about who actually made the mosaic ceilings of the Hypostyle Room in the park, Gaudí or Jujol. I have an Art History book about Gaudí that says that the ceiling mosaics were made by Josep M. Jujol, so I stick to that.

a star for Gaudí and Jujol
It was my first ever fabric collage/mosaic made of pieces this tiny. For the circle I used templates of fusible web and after I ironed all the little fabric pieces onto this web I cut them out and fused the shapes (center circle, starry points and negative spaces) to the background fabric. The  fabrics around the circle are all glued to the background after I used some basting spray. I chose to quilt it very densely to prevent the little fabric pieces from getting loose. The edge is finished with a blanket stitch.

It was a lot of fun, but I don’t know if I will ever ‘construct’ another collage/mosaic quilt!

Nicolette

Sunday, May 27, 2012

Green...in green...on green!

I initially drew a blank with this one, but I grabbed my pencil and started writing words that suggested "green".  As the list grew an idea started to take shape. Here is the result.

I thought I would print the words out on different green fabrics, but after several failed attempts, gave up that idea.  Besides I had to get packed for my trip to Empty Spools and I would let the idea percolate for a while.  Good thing I chose to wait because a trip to a quilt shop in McMinville, Oregon on the way there provided the perfect fabric to put my idea in motion.
You can see the fabric piece here.   Half the width of the fabric was used for the background, while the other half was used to make the words. 
I felt the piece was a bit "top heavy" so to balance it out I added small embellishments; a leaf that I made from two layers of tulle and some frog buttons.  I would like to add some beads vertically to the left of "fern".  What do you think?