Sunday, December 18, 2011

Looking Up

Although I haven't gotten to the actual construction yet, I have been thinking about the next challenge.  I find it interesting that this challenge also easily relates to a body part that has been affecting me- my eyes!

I had cataract surgery about four years ago, and recently had to undergo a simple laser procedure to take care of a fairly common aftereffect- the sac that holds the lens also goes opaque.  I'd been noticing that my vision was getting more and more blurry, and even my glasses couldn't take care of it.  My contact only  made it worse- blurry vision looking through water!  I was relieved to find that it can be fixed fairly simply, and also to learn that the vision in my other eye had actually gotten less nearsighted.  So now I am back to glasses only, but I don't need to use them all the time, only when distance vision is important- like driving!

So I am thinking about how to portray this in my piece, hopefully without being too literal.  We shall see how successful I am.  I had so much fun with the mixed media approach last time, I will probably go there again.  Love playing with all those gel mediums and paints!

Monday, December 12, 2011

what's colour got to do with it?

I just thought I would post this as a little chrissy present. 
Dale Ann Potter has a feature on her blog called Friday Colour Inspiration.
Now "what" - I can hear you ask "has colour got to do with it?".
Well if you look at the little pictures she provides each week, and this is also true of  3 Creative Studios (Oh, I will miss them) colour palettes - they are an example of something called a


Look up Table  (or colour palette)


Here is also a link to this topic in Wikipedia.
I researched this as one of my ideas, but I will not be using this as I have finally sketched something up last night.  You are all welcome to use it!!!
Merry Christmas all


Tuesday, November 22, 2011

Up in the trees

Here's a little something that fits the 'look up' theme.  It was inspired by the theme, but I decided to make it to fit a hanger I had.  So it is decidedly the wrong shape!

Monday, November 21, 2011

My challenge

 Red buttons
As I said I would, here is an outline of the techniques in my last piece.


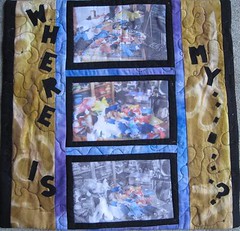
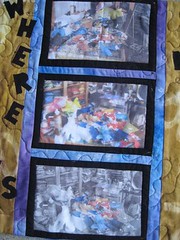
Here is the finished piece.  As you can see it is made up of lots of little mini quilts.  In fact, I assembled so many of these, I have enough to make another one, with different techniques to these, and I will show these on my blog as I do them, rather than after the event, like I am now.
In no particular order, here are the little quilts and what I did with them.
All of the little quilts were backed with felt.

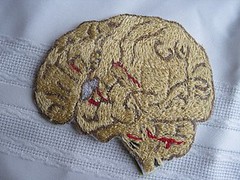
This one had a background fabric of textured brocade in brown and gold.  The background was overlaid with red sinnamay , which is a very stiff netting used in hats, woven from abaca.
I have then beaded randomly with gold seed beads around the two motifs.
The motifs are mad up of a square of red lutradur (or rainbow spun from pellon). Over this I have laid two flowers cut with a soldering iron from gold shot organza and the red lutradur, then I added the gold buttons, which came from a uniform of some sort.  The panel was bound with red satin ribbon and a running stitch in a thick gold thread.
This next one (I have rotated some of the photos so they show better on the blog) has a thick gold brocade as the base.  Over that I have taken a very thin red chiffon and done some large smocking.  On alternate smocking intersections I have sewn on either
stacked buttons, an antique mother of pearl and a pearly red with a large gold seed beed, or
a small gold seed bead and red sequin. 
I have also added groups of three gold bugle beads down the centre triangles.
This panel is not bound, but has a red chain stitch with gold french knots down each side.
This panel was made from a red brocade with a gold woven pattern.  The motifs were layered from a gold lutradur flower, a gold shot organza flower, a transparent red button and a gold heart brad, which was poked down through the hole of the button for a perfect fit!
This one was not bound, but has a fly stitch in red around the edge with gold seed beads.

This panel was my favourite.  It had almost no sewing in it!  The base is a red fabric paper made from foils.  This was attached with large square brads.
Then a square of head distressed red chiffon and a square of gold shot cotton which had been frayed were attached with smaller square brads.
The red flower applique was an iron on one I had had in my sewing box for many years, then I added a gold filligree button I got from my Mother.
This panel had a panel of a japanese patterned red and gold brocade.  The button motifs were stacked from an antique dark red button, an antque mother of pearl button, a red star sequin and a large red seed bead.
Again, this one had a turned edge and was edged with red bugle beads interspersed with cross stitch in a very thick gold thread.
This one had a see through base, so the felt showed through.  The first layer was an angelina fibre film with gold organza and cream velvet pieces in it.  This was overlaid by a piece of red plastic netting from a fruit bag.  The motifs were composed of an antique mother of pearl button, a gold button and a red facetted bead, surrounded by spokes of  red bugle beads and a further circle of cold seed beads.
This panel was bound with a red organza ribbon attached with fly stitch in red thread.
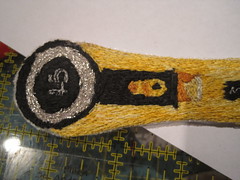
This was my other favourite panel.  It was based on a piece of textured gold brocade bound with gold satin ribbon.  The motifs were made from a flower stencilled with modelling paste, allowed to dry, then painted with gold acrylic.  Each flower centre is a triangular red button topped with a large gold seed bead.  These were sewn on with gold thread in a type of wrap, so the gold thread forms 3d spokes.  It is hard to see in the picture, but is gorgeous in real life if I do say so myself.
I beaded in a diagonal grid with red seed beads in the spaces between the motifs.
This little one is a bit blurry.  The base os a bronze brocade quilted in diagonal running stitch with red thread.  It was bound with red nylon knitting tape, to which I added red seed beads.
The motif is layered from a large red, then gold lutradur flower, then a small red lutradur flower and a very old red button I had as a child.  I added some gold seed beads in the apexes of the petals of the button.
 This very simple panel was formed on a base of a pale gold brocade with red painted fusible ironed on top.  I used another red daisy applique and  a flat gold metal button that had a shank, but was set flat by punching a hole threough the centre of the layers.  This was surronded by a scattering of gold seed beads and two little embroideries, the bound with blanket stitch in red.
This little one was made on a base of shot furnishing fabric in gold and brown.  A piece of shot metallic and red organza was frayed and placed over the top, held down by a row of gold seed beads top and bottom.
The motifs were stacked of a large antique button, not plastic, but probably bakelite, which makes it quite old, a red transparent button and a square bronze pearly button.  Again I attached these using the wrapping technique, which created two wings of spokes in red metallic thread because of the two button holes.
Another small one, had a red satin base with chain stitch top and bottom in a red perle thread.
Over this I put a piece of distressed ciffon in a red and gold textured colour.  The gold lines are metallic perl wire coils which were couched on.  The buttons were simply some gold thimble shapes that I couldn't resist.
Getting near the end now.  This one has red taffeta that I have tacked onto the felt underlay.  There is a glod lutradur square attached with small gold brads, a red lutradur flower and a red felt flower I bought in a packet at a discount store and then a tortoise shell button with a gold filigree centre.
This panel I had a lot of fun putting together.  The base is a bronzy/gold brocade.  Each gold button is set on a tiny label/tag which has been painted red with nail polish (the mixed media artist's best friend).  the buttons are attached with a large red seed bead and the tags each have a bow made from thick gold thread and are sewn down through the hole.
I couched on some red satin cord on a wavy pattern and emphasised it with long red stitches.
 This tiny one was made from an origami hexagon folded from gold lurex.  The hexagon was actually made for a christmas table runner, but I decided to use white instead and this fit in perfectly for this piece.  The centre is a mother of pearl button and a small red button attached with  a large red seed bead.
This final panel, although ver small had a lot of work in it due to the seed bead border.  It is simply a god button with a red centre and red organza flowers on a piece of gold satin.

Wow, it almost took me as long to explain this quilt as it did to make it!
 The whole quilt, with some painted lutradur as the top under the panels, was quilted with running stitch before the panels were added and bound with textured red organza ribbon decorated with red bugle beads and see beads.

Oh, and I forgot.  It was all done by hand

Wednesday, November 16, 2011

Reasons to look up

How can Alice do anything but LOOK UP when she is in this situation? 
 The picture I wanted to show you was actually Alice looking up over the toadstool at the caterpillar, but I couldn't find this scene in the public domain. 
I am sure there are lots of other situations in stories where characters are in a looking up situation, but Alice was the one I thought of first.

Tuesday, October 25, 2011

up or upwards

Thanks Vicki for not wanting me to get lost into translation!

The first that came to mind after reading the new theme ‘look up’, was to search in my photo-albums for some pictures I took during vacations. I’ve always loved to potograph buildings, mountains, streets, objects (let’s say scenery) from a low perspective (or do I need to say from a lower point of view...?)
I found some really wonderful graphic images that could be used. Is this one of the right directions to take, is it looking up or upwards?

I found this (looked it up, yeah!) in one of my English dictionaries (much the same as Janet already explained, but I always love those text bits from dictionaries...

look up
1. To search for and find, as in a reference book.
2. To visit: look up an old friend.
3. To become better; improve: Things are at last looking up.
look up to
To admire: looked up to her mother.
look up
vb (adverb)
1. (tr) to discover (something required to be known) by resorting to a work of reference, such as a dictionary
2. (intr) to increase, as in quality or value things are looking up
3. (intr; foll by to) to have respect (for) I've always wanted a girlfriend I could look up to
4. (tr) to visit or make contact with (a person) I'll look you up when I'm in town
Verb1.look up - seek information from; "You should consult the dictionary"; "refer to your notes"
research - attempt to find out in a systematically and scientific manner; "The student researched the history of that word"
 
Would love to hear your thoughts on this. 

Nicolette

Sunday, October 23, 2011

The next challenge!

After admiring our quilts over and over, it is now time to put your creative skull caps on again!
Our next challenge, due January 15, 2012 will be based on the theme Look up
This is another one of those phrases that has a multitude of meanings - literal and figurative.


Look up in the sky - is it a bird?  Is it a plane? 

Look up something in a dictionary or book (or internet!)  I'm going to have to look up the meaning for that word, or look up an old friend from school  

 Look up to another individual - he always looked up to his big brother
 
things are starting to look up around here - got a new job, things are improving 


We'll keep with the 16" square format. 

 I can't wait to see what everyone comes up with!  Now, off to start looking up some inspiration!

Our latest achievements!

What a great collection of quilts!!!

Tangled Textiles' challenge #2 mosaic


So many unique interpretations of the theme
and 
so many techniques and materials used!!!

Saturday, October 22, 2011

Tools of Silent Conversation

Tools huh… My first thought was to go back to simpler times, and simpler tools.  But nothing was stirring my creative juices.  I considered communication tools but ruled out anything electronic.  Suggestions from the rest of the group, and Vicki’s post earlier encouraged me to think “outside the box”.  That’s when the beginning of an idea hit me. 
 
Conversation is a tool of communication.  But I had no idea how to portray conversation in fabric.  It wasn’t coming to me.  Then one day while sitting in a coffee shop I watched as a young man and his lady friend were having an intense conversation.  No sound was made, but you could tell that the conversation was lively and entertaining from the expressions on their face.  They were deaf and using sign language.  That’s when I had my “aha” moment.  I was intrigued by the flurry of hand gestures even though I did not understand what was being said.  So this is my tribute to the tools of silent conversation.

The hand symbols were printed on Lutradur.  It took several attempts to get the print to come out sharp enough.  You can read more details on my blog here.  I then added the thread-sketched eyes (my first attempt at thread sketching I might add) to reference that this type of conversation requires two tools; both hands and eyes.  The additional stitching connects the two “tools” to form the conversation.

This theme was a challenge for me but I think I managed to complete it successfully.  Besides I also used two “tools’ I had never used before; Lutradur and thread sketching.

Friday, October 21, 2011

My Tools of the Trade

Tools of the Trade
16' x 16"
Rusted and Hand Dyed fabric, paint, acrylic medium, paintstiks

Perhaps advancing age has made me more aware of how much I have taken my hands and their uses for granted.  I am feeling them more and more, and not always in a good way!  I really do see my hands and eyes as my most important tools- the tools I buy would be useless without them!  So I chose my hands as the tool I wanted to portray in my piece.

I also wanted to experiment with something I saw in a recent issue of Quilting Arts, using mixed media materials that I have, but never done much with.  And I wanted to find a way to use my rusted material without making me or my sewing machine crazy!

My rusted fabric has always reminded me of the rock art that is so prevalent in the American Southwest.  I wanted to create a piece that referenced the art of those ancient peoples without duplicating it.  

I used black felt as my base, and fused torn strips of rusted and hand dyed fabric.  After a coat of matte gel medium, I stitched, then added paint and torn pieces from a dictionary page.  I just continued to add paint, stamps, and fabric strips until I was happy with the look.  The last touch was the large image of the hand, which I did with a freezer paper stencil and Shiva paintstiks.  I then gave it a last coat of gel medium.

I really debated how to finish the edge.  I didn't want to have a hard edge with stitching or binding.  I finally figured out how to stitch on a doubled piece of tulle in a greeny-turquoise that works fantastically with the rust tones. It gives the piece the soft shadowy edge I was looking for.


It was a strange experience making this piece.  It is so different than my previous work- at times I would look at it and wonder 'Where did this come from?'  As I have lived with it hanging on my studio wall, however, I've come to love it and claim it as mine.  I will definitely be playing more with mixed media in the future.

Fractured Sewing Gallery

I had a hard time deciding which tools I was going to use. When I decided on sewing tools, I started by photographing some of the items I use when creating fiber art and then manipulating the images in Photoshop. After printing these images on fabric, I was disappointed with the results and decided to locate vintage images related to sewing. I took these images into Photoshop, layered them over other images and then printed them on commercial fabric especially designed for ink jet printing and the results were much better. 

After completing the first piece, I decided it was too much like a traditional quilt. I think you will agree.

Tools 1

I had printed more images then I could possible use so I proceeded to construct a "fractured" sewing gallery. I sliced through the images and then fused them to another piece of fabric which served to frame the image. These were then pieced and machine quilted. So the ending result in not quite as "quilt like" as the first attempt.

Tools 2

I was not happy with the traditional method of turned binding as an edge finish. After looking through several books for ideas, I came across a finishing technique called No-Binding Binding in Art Quilt Workbook by Jane Davila and Elin Waterston. ( Scroll to page 80 for instructions). This technique was easy to do and resulted in edges which hang straight and are not wavy.

Do What You Know...

I found the theme of challenge #3
to be....
a challenge!

As you recall, I had a couple of false starts before
I did what I know
and I ended up creating these...

challenge #3, tools: Where's My ....?

Well, not really these.

But this...

challenge #3, tools" Where's My....?

Yes, it is really just ONE quilt!!!

I started with a couple of photos of my cutting table in its often state of disarray
(yes, I am not proud of it but it is reality!)

 I edited them using tools in Picnik,
challenge #3
printed three of them on muslin,
and bordered  the photos using a couple of 
my sunprints that have tools...
safety pins...
sun dyed fabric

and 
scissors...

sun dyed fabric

I then tried my hand at thread sketching
(I took a class with Nancy Prince last year and never finished the project,
but hey! I learned a lot!)

thread sketched rotary cutter
and added a piece of velcro on the back of the rotary cutter.

Then I got the idea that this is by no means the only tool
that gets lost on my cutting table, so...
since I had a piece of velcro on the front of the quilt
to hold my rotary cutter....


challenge #3, tools" Where's My....?

I also added a strip of velcro to the back of the quilt..

challenge #3

to hold my extra tools
while I display one on the front...

challenge #3

depending on what disaster has afflicted me for the moment.

And yes...
there are days when I feel that I have lost
one of the most basic tools I have...

a thread sketched brain
(my brain!)

Tic-Tact-Toe, Hand or Machine

When I finally decided I wanted to use sewing tools I was suddenly hit with the idea of tic-tact-toe as I started sketching various tools.Perhaps our first theme of games was still in my head. I always admired the hand stitched quilts but I've always stitched as much as possible with my machine. But the choice is always there for me. I thought it was a slam dunk once I had decided on the two tools that would have the dual but then I had an unlimited number of options for how the game would play out. I also started out with the idea of hand stitching the black cording and struggled getting it through my quilt until I discovered a glove made it much easier. (more photos over at my blog) Half way through I decided that was not looking good so Machine won again and the cord was machine stitched in place. I made up for not being able to free motion quilt on the last challenge and free motioned everywhere on this one. I guess Machine really won the dual of tools this time!

The Words Remain


I started out with all kinds of different ideas – maybe some old fashioned or antique hand tools would be interesting?  And then I thought what about a plow horse – that could be considered an important tool for farmers of yore – that could be interesting.  But, with both of these, I just couldn’t find the right image to spark the rest of the design - I just wasn’t feeling it.  Then I thought about writers – words and letters are the tools of their trade.  This was starting to feel more like it!  With my first ideas, I was drawn to the way things used to be done.  This got me thinking about how tools have changed – things that used to be common place are no more.  Things change – progress, new ways and means and methods of doing things are developed.  A thought ran through my mind – “the tools may have changed, but the words remain.”  I just couldn’t shake this thought, and it was just what I needed.  My piece is a whole cloth linen quilt, with a thread sketched feather quill and inkwell, depicting the way it used to be done – an old tool.  The background is all quilted words, all written with my sewing machine – a new tool - but the words remain.

The Words remain

allover quilted writing


quilted words

Thread painted
Thread sketching