Tuesday, October 25, 2011

up or upwards

Thanks Vicki for not wanting me to get lost into translation!

The first that came to mind after reading the new theme ‘look up’, was to search in my photo-albums for some pictures I took during vacations. I’ve always loved to potograph buildings, mountains, streets, objects (let’s say scenery) from a low perspective (or do I need to say from a lower point of view...?)
I found some really wonderful graphic images that could be used. Is this one of the right directions to take, is it looking up or upwards?

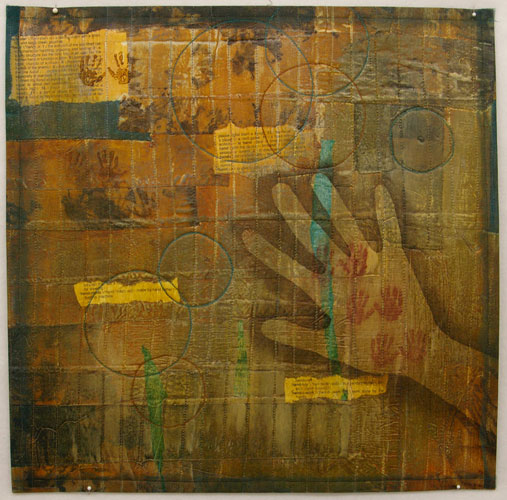
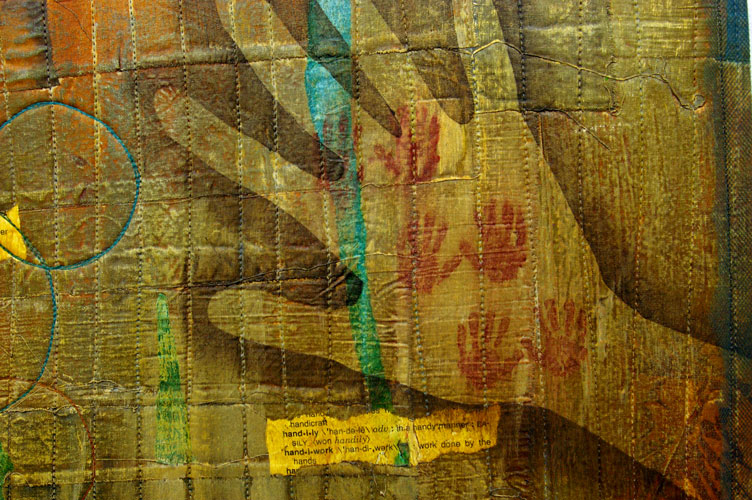
I found this (looked it up, yeah!) in one of my English dictionaries (much the same as Janet already explained, but I always love those text bits from dictionaries...

look up
1. To search for and find, as in a reference book.
2. To visit: look up an old friend.
3. To become better; improve: Things are at last looking up.
look up to
To admire: looked up to her mother.
look up
vb (adverb)
1. (tr) to discover (something required to be known) by resorting to a work of reference, such as a dictionary
2. (intr) to increase, as in quality or value things are looking up
3. (intr; foll by to) to have respect (for) I've always wanted a girlfriend I could look up to
4. (tr) to visit or make contact with (a person) I'll look you up when I'm in town
Verb1.look up - seek information from; "You should consult the dictionary"; "refer to your notes"
research - attempt to find out in a systematically and scientific manner; "The student researched the history of that word"
 
Would love to hear your thoughts on this. 

Nicolette

Sunday, October 23, 2011

The next challenge!

After admiring our quilts over and over, it is now time to put your creative skull caps on again!
Our next challenge, due January 15, 2012 will be based on the theme Look up
This is another one of those phrases that has a multitude of meanings - literal and figurative.


Look up in the sky - is it a bird?  Is it a plane? 

Look up something in a dictionary or book (or internet!)  I'm going to have to look up the meaning for that word, or look up an old friend from school  

 Look up to another individual - he always looked up to his big brother
 
things are starting to look up around here - got a new job, things are improving 


We'll keep with the 16" square format. 

 I can't wait to see what everyone comes up with!  Now, off to start looking up some inspiration!

Our latest achievements!

What a great collection of quilts!!!

Tangled Textiles' challenge #2 mosaic


So many unique interpretations of the theme
and 
so many techniques and materials used!!!

Saturday, October 22, 2011

Tools of Silent Conversation

Tools huh… My first thought was to go back to simpler times, and simpler tools.  But nothing was stirring my creative juices.  I considered communication tools but ruled out anything electronic.  Suggestions from the rest of the group, and Vicki’s post earlier encouraged me to think “outside the box”.  That’s when the beginning of an idea hit me. 
 
Conversation is a tool of communication.  But I had no idea how to portray conversation in fabric.  It wasn’t coming to me.  Then one day while sitting in a coffee shop I watched as a young man and his lady friend were having an intense conversation.  No sound was made, but you could tell that the conversation was lively and entertaining from the expressions on their face.  They were deaf and using sign language.  That’s when I had my “aha” moment.  I was intrigued by the flurry of hand gestures even though I did not understand what was being said.  So this is my tribute to the tools of silent conversation.

The hand symbols were printed on Lutradur.  It took several attempts to get the print to come out sharp enough.  You can read more details on my blog here.  I then added the thread-sketched eyes (my first attempt at thread sketching I might add) to reference that this type of conversation requires two tools; both hands and eyes.  The additional stitching connects the two “tools” to form the conversation.

This theme was a challenge for me but I think I managed to complete it successfully.  Besides I also used two “tools’ I had never used before; Lutradur and thread sketching.

Friday, October 21, 2011

My Tools of the Trade

Tools of the Trade
16' x 16"
Rusted and Hand Dyed fabric, paint, acrylic medium, paintstiks

Perhaps advancing age has made me more aware of how much I have taken my hands and their uses for granted.  I am feeling them more and more, and not always in a good way!  I really do see my hands and eyes as my most important tools- the tools I buy would be useless without them!  So I chose my hands as the tool I wanted to portray in my piece.

I also wanted to experiment with something I saw in a recent issue of Quilting Arts, using mixed media materials that I have, but never done much with.  And I wanted to find a way to use my rusted material without making me or my sewing machine crazy!

My rusted fabric has always reminded me of the rock art that is so prevalent in the American Southwest.  I wanted to create a piece that referenced the art of those ancient peoples without duplicating it.  

I used black felt as my base, and fused torn strips of rusted and hand dyed fabric.  After a coat of matte gel medium, I stitched, then added paint and torn pieces from a dictionary page.  I just continued to add paint, stamps, and fabric strips until I was happy with the look.  The last touch was the large image of the hand, which I did with a freezer paper stencil and Shiva paintstiks.  I then gave it a last coat of gel medium.

I really debated how to finish the edge.  I didn't want to have a hard edge with stitching or binding.  I finally figured out how to stitch on a doubled piece of tulle in a greeny-turquoise that works fantastically with the rust tones. It gives the piece the soft shadowy edge I was looking for.


It was a strange experience making this piece.  It is so different than my previous work- at times I would look at it and wonder 'Where did this come from?'  As I have lived with it hanging on my studio wall, however, I've come to love it and claim it as mine.  I will definitely be playing more with mixed media in the future.

Fractured Sewing Gallery

I had a hard time deciding which tools I was going to use. When I decided on sewing tools, I started by photographing some of the items I use when creating fiber art and then manipulating the images in Photoshop. After printing these images on fabric, I was disappointed with the results and decided to locate vintage images related to sewing. I took these images into Photoshop, layered them over other images and then printed them on commercial fabric especially designed for ink jet printing and the results were much better. 

After completing the first piece, I decided it was too much like a traditional quilt. I think you will agree.

Tools 1

I had printed more images then I could possible use so I proceeded to construct a "fractured" sewing gallery. I sliced through the images and then fused them to another piece of fabric which served to frame the image. These were then pieced and machine quilted. So the ending result in not quite as "quilt like" as the first attempt.

Tools 2

I was not happy with the traditional method of turned binding as an edge finish. After looking through several books for ideas, I came across a finishing technique called No-Binding Binding in Art Quilt Workbook by Jane Davila and Elin Waterston. ( Scroll to page 80 for instructions). This technique was easy to do and resulted in edges which hang straight and are not wavy.

Do What You Know...

I found the theme of challenge #3
to be....
a challenge!

As you recall, I had a couple of false starts before
I did what I know
and I ended up creating these...

challenge #3, tools: Where's My ....?

Well, not really these.

But this...

challenge #3, tools" Where's My....?

Yes, it is really just ONE quilt!!!

I started with a couple of photos of my cutting table in its often state of disarray
(yes, I am not proud of it but it is reality!)

 I edited them using tools in Picnik,
challenge #3
printed three of them on muslin,
and bordered  the photos using a couple of 
my sunprints that have tools...
safety pins...
sun dyed fabric

and 
scissors...

sun dyed fabric

I then tried my hand at thread sketching
(I took a class with Nancy Prince last year and never finished the project,
but hey! I learned a lot!)

thread sketched rotary cutter
and added a piece of velcro on the back of the rotary cutter.

Then I got the idea that this is by no means the only tool
that gets lost on my cutting table, so...
since I had a piece of velcro on the front of the quilt
to hold my rotary cutter....


challenge #3, tools" Where's My....?

I also added a strip of velcro to the back of the quilt..

challenge #3

to hold my extra tools
while I display one on the front...

challenge #3

depending on what disaster has afflicted me for the moment.

And yes...
there are days when I feel that I have lost
one of the most basic tools I have...

a thread sketched brain
(my brain!)

Tic-Tact-Toe, Hand or Machine

When I finally decided I wanted to use sewing tools I was suddenly hit with the idea of tic-tact-toe as I started sketching various tools.Perhaps our first theme of games was still in my head. I always admired the hand stitched quilts but I've always stitched as much as possible with my machine. But the choice is always there for me. I thought it was a slam dunk once I had decided on the two tools that would have the dual but then I had an unlimited number of options for how the game would play out. I also started out with the idea of hand stitching the black cording and struggled getting it through my quilt until I discovered a glove made it much easier. (more photos over at my blog) Half way through I decided that was not looking good so Machine won again and the cord was machine stitched in place. I made up for not being able to free motion quilt on the last challenge and free motioned everywhere on this one. I guess Machine really won the dual of tools this time!

The Words Remain


I started out with all kinds of different ideas – maybe some old fashioned or antique hand tools would be interesting?  And then I thought what about a plow horse – that could be considered an important tool for farmers of yore – that could be interesting.  But, with both of these, I just couldn’t find the right image to spark the rest of the design - I just wasn’t feeling it.  Then I thought about writers – words and letters are the tools of their trade.  This was starting to feel more like it!  With my first ideas, I was drawn to the way things used to be done.  This got me thinking about how tools have changed – things that used to be common place are no more.  Things change – progress, new ways and means and methods of doing things are developed.  A thought ran through my mind – “the tools may have changed, but the words remain.”  I just couldn’t shake this thought, and it was just what I needed.  My piece is a whole cloth linen quilt, with a thread sketched feather quill and inkwell, depicting the way it used to be done – an old tool.  The background is all quilted words, all written with my sewing machine – a new tool - but the words remain.

The Words remain

allover quilted writing


quilted words

Thread painted
Thread sketching

tools... ?


Unexpected wheels
16" x 16"
mixed media

I was really glad to get some feedback from you all and even happier with the fact that the quilt didn’t necessarily need to show tools. Obviously everything I would make would involve tools. That was a light bulb moment and I was able to start from there all over again.

Working on this quilt was fun and filled with experiments. You can read all about it and see lots of pictures of the different phases on my private blog.

I still need to finish the edges of the quilt, and maybe I want to make more embellishing stitches on the painted areas, but the quilt is still drying as we speak. I don’t want to use a fabric binding, so I think it will be finished with a machine stitched blanket stitch. I’m open to suggestions from your part!

I’m happy with the overall result. And.. you know what I love... ? That my third quilt also involves circles!

I was inspired to make this quilt by a Quilting Arts workshop video about Mixed Media Art Quilts (with Beryl Taylor). I also purchased a workshop video from Cloth Paper Scissors about fabric paper. Maybe something for the next challenge?

Thanks Gina for a wonderful theme that got my mind tangled!

Nicolette

I see red

When I started this theme, I was very literal about the topic, but about two weeks ago someone gave me a piece of fabric with buttons on it and it started me thinking.  This fabric did find it's way into my quilt.... as the backing.
This quilt was really something totally different for me and is really a lot of little quilts on a bigger quilt.  And, all the little quilts are about buttons!.  I decided that since a tool is something we use to make a task easier, then buttons are a tool. 
This quilt is loosely based on Beryl Taylor's work and has a multitude of materials and techniques.  It occured to me as I was making it (all by hand - and I loved it!) that the whole quilt is actually a tool.  It is a sampler.
I actually have a second in production, as I made too many blocks and they would not all fit (since I just made them up as I went along), so it will be one of a pair, both quite different because they have different materials and techniques, but the same because they are red and gold button quilts.
Here's a list of the materials, in no particular order:
satin ribbon, brocade, sinnamay, shot crepe, hand painted lutradur, rainbow spun, fabric paper, embroidered applique, angelina, velvet, metallic organza, modelling paste, nylon knitting ribbon. plastic onion netting, painted fusible, shot organza, satin, organza, felt, hand painted cotton, brads, sequins, beads, seed beads, bugle beads, metallic perl coil, a variety of weights of matching thread, cardboard labels, nail polish, gold acrylic paint, satin cord,  and a few buttons....
And the techniques:
beading, running stitch, smocking, chain stitch, fly stitch, cross stitch, seed stitch, satin stitch, blanket stitch, whip stitch, distressed chiffon, stacked buttons, angelina fused film, painted fusible, stencilled modelling paste, frayed edges, origami and a bit of assembly stitching.

Wow, that was a mouthful! and I only used half the blocks I made!  Anyway, as I said, this is very different for me and I hope it's not too different.  It's just what I felt like at the time, lol.

Looking forward to your reveals, but it's bed time here!

Thursday, October 20, 2011

ideas that didn‘t make it

When I read Gina’s post about the tools she didn‘t do, I remembered what my take of was.

My initial idea was to make a quilt about wings, a tool needed to fly. I started with an enlarged picture of a dragonfly wing and got lost.

When I was decluttering my workspace I discovered some sketches in watercolour and gouache. I made them about 20 years ago.


My idea was to make a quilt with yet another appliqué technique. However, I really wanted to do something else for this challenge so I started looking for colourpencils to use on fabrics, to achieve the pastel look of the watercolour sketch. 


The same story goes for the scissors


as well as the safety pins.

What you will find here tomorrow is something totally different!

Can’t wait to see what you have all been working on!

Nicolette

Wednesday, October 19, 2011

The Tools I Didn't Do

 
This challenge has been another time challenge for me. When I returned home from vacation I had only one month to create my quilt along with a LOT of catch up to do at home. I wondered the house looking for tools and then looked through some of my old sketchbooks. I came across some sketches of tools I did at school a few years back. I dug out the actual works that I had made from those sketches and thought they were great inspiration for this challenge. I considered many options for colors, tool choices, fabrics, techniques, etc but with dwindling time I opted out of this option. So maybe one day these old projects will become little fabric quilts. The busier of the two (old, yellowed and missing parts) is a combo of my pottery tools and kitchen tools.
 Looking forward to Friday when we get to see what those teases below reveal!


Tuesday, October 18, 2011

Tool time approaches

I've been busy, but I'm not done yet.  Does this give you any ideas of what I'm working on?
what the heck is it?
I'm getting closer to being finished, but have had a setback with a nasty cold and today a migraine, but hope to get it done on time!

Monday, October 17, 2011

Which Tool...

do you think I am working on?  Here is a sneak peek.

Yeah this doesn't give much away does it?  It was an attempt at printing onto Lutradur, but something tells me that I still need to do some fine tuning.  Oh well, you'll just have to wait till Friday to see what I have come up with.

Sunday, October 16, 2011

Artist Feature

Guess what? One of our own, Lisa Filion is the featured fiber artist by 3 Creative Studios this month. Check out the interview and her blog. Congratulations, Lisa.

Wednesday, October 12, 2011

I feel like I am at a ball game!!!

Truth be told...I am not a big fan of baseball but this challenge really has me crying foul!!! Well, not really but the theme had me stumped.

I actually have had several tries to get this project going...

Striiiiiiiike one!!!!!

strike 1!!! 
Thread painting seemed like a great idea at the time but
I have discovered that I really DO NOT have the patience
to create a 16"x16" quilt in this technique!!!!


Striiiiiiike two!!!!!


strike 2!!!
This is an image transfer using Citra-Solv.
It was fun to try, even smelled good,
but even though my photograph isn't great,
this transfer was too light to work with.

Striiiiiii----------- 

Wait!
I think we have a winner!!!!

strike----!!! No we have a home run!!!

Yes, I think we do!!!!!
Don't you wanna know what it is!??? 

Well, I won't print the date since I messed that up last round 
but you will see the whole baseball diamond, so to speak, 
on reveal day!!!

Tuesday, October 11, 2011